Set Up Your Photogrammetry Station
1. Place a black turntable on a table (or stand) in front of a black backdrop.
2. Set your object on the center of the turntable.
3. If desired, place a scale and color/white balance card on the turntable next to the object. Do not place these on the object. These will be used to correct the size and color of your digital model during the creation process.
4. Position the DSRL camera and tripod directly in front of the turntable and align the camera lense directly with the center of your object.
a. Position the camera and tripod to capture the whole object (if possible) while eliminating as much of the background as possible
b. Adjust the center pole of the tripod so that you can raise or lower the camera without having to adjust the tripod legs. Later you will capture sets of images at multiple heights and angles.
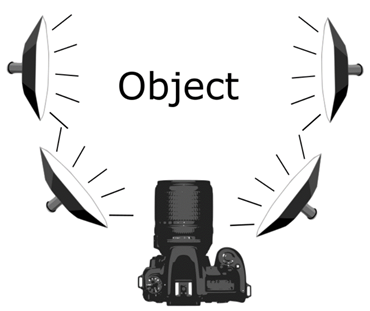
5. Use adequate lighting to reduce or eliminate shadows on the object. Place 2-point or 4-point lighting (with diffusers) on either side of the object/camera.
6. Connect your wired or wireless camera remote. Use a wireless or wired remote to reduce the amount of shaking caused by pressing the capture button.
Set Your Camera Settings
The equipment, environment, and object you photograph will vary, as such, the suggested values below will also vary depending on your situation. Key settings are listed below.
1. Zoom - Set your lens to properly frame the object, try to maximize the subject in the view while reducing the visible background. Ensure the object will remain in frame when rotated. Do not adjust the Zoom once set, use painter’s tape to prevent the Zoom ring on the lens from moving. If you have a prime lens you can skip this step.
2. Focus - Set the focus manually (turn off the auto focus feature) for full control.
a. If the whole object cannot be in focus at once, manually focus on an area that is equidistant from the front and back of the object in that frame.
3. Aperture - Set the aperture value (also called the f-stop) to reduce the depth of field, this will result in having the majority of the object in focus at the same time. Typically between f/8 and f/16.
a. If it is an option on your camera, you can use the Aperture Priority (A or AV) mode. This feature sets the aperture as the most important factor and configures the other settings to the aperture.
4. ISO - Set your ISO as low as possible, 100 to 200 range if possible.
5. White Balance - Set your white balance.
6. Shutter Speed - Set your camera to a 1/80 shutter speed or higher depending on the light quality.
a. If you are working in aperture priority (A or AV) mode skip this step. The camera will adjust the shutter speed accordingly.
7. Flash - Turn off the built-in camera flash. Only rely on the lighting setup you constructed.
Capture Your Photos
1. Take a photo, rotate the turntable 10° and take another photo. Continue until you completed a full rotation (36 images). This will ensure that each consecutive photo has an overlap of at least 65%.
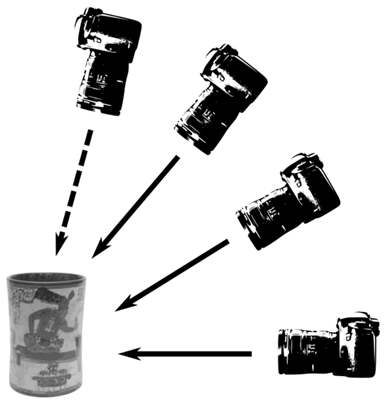
2. Move the camera up by adjusting the center pole of the tripod, then adjust the angle of the camera to view the object. Repeat Step 1 at the new position.
3. Complete a rotation at multiple angles: 0°, 45°, and 60° to 70°.
4. Take a photo of the turntable and background without the object.
5. Turn the object upside-down and repeat Steps 1 through 3 if you want to capture the bottom of the object.
6. Capture images in both RAW and JPEG (or PNG) file types.
Process Images
The text below describes how to process images using Agisoft Metashape. The text was adapted from Agisoft’s Helpdesk Portal article, 3D Model Reconstruction.
1. Select Align Photos command from the Workflow menu.
2. Set the following recommended values for the parameters in the Align Photos dialog:
a. Accuracy: High
b. For larger number of images (more than 100) enable the Generic preselection option, to reduce processing time.
c. Key point limit: 40,000
i. Key point limit the recommended range of 20,000 to 100,000.
d. Tie point limit: 10,000
i. Tie point limit the recommended range of 2,000 to 40,000.
e. Do not use the Guided image matching or Adaptive camera model fitting parameters.
3. Click OK button to start photo alignment.
Refine bounding box position and orientation to fit the desired volume for reconstruction. Bounding box can be resized, moved and rotated with the help of Resize Region, Move Region and Rotate Region tools.
1. Select Build Dense Cloud command from the Workflow menu.
2. Set the following recommended values for the parameters in the Build Dense Cloud dialog:
a. Quality: Medium
i. Higher quality takes quite a long time and demands more computational resources, but allows for more detailed results generation.
b. Depth filtering: Mild
i. If the geometry of the scene to be reconstructed is complex with numerous small detail on the foreground, then it is recommended to set Mild depth filtering mode, for important features not to be sorted out).
c. Check Calculate point colors
3. Click OK button.
1. Select Build Mesh command from the Workflow menu. Set the following recommended values for the parameters in the Build Mesh dialog:
a. Source data: Depth maps
b. Quality: Medium
c. Face count: Medium
d. Check Reuse depth maps, if the Depth maps were built and saved in the project at the previous stage.
2. Click OK button to start building geometry.
1. Select Build Texture command from the Workflow menu.
2. Set the following recommended values for the parameters in the Build Texture dialog:
a. Texture type: Diffuse map
b. Source data: Images
c. Mapping mode: Generic
d. Blending mode: Mosaic (default)
e. Texture size/count: 16,000 x 1
f. Check Enable hole filling, if you want a solid model.
g. Check Enable ghosting filter
3. Click OK button to start building texture.
Note: Usually, the texture atlas size in the range of 4096 - 16 384 pixels is sufficient.
1. In case the model should be exported to the file, select Export Model... command from the File menu.
2. In the Export Model... in the dialog box, select options to export the 3D model.
3. Click OK button.
Hamilton College, 198 College Hill Road, Clinton, NY 13323 • 315-859-4735 • Copyright © 2024 The Trustees of Hamilton College. All rights reserved.